Pattern is made with Julie ( Innerbanks in ravelry) ,she checked&tested&corrected wrongwritings,example original pattern did included "leg" instead of "stem" :)), so help was very needed,biiiig thanks to her :))
So Here It Comes:
You will need 3 colors: one for the centre(example yellow),one for petals of flower(example pink),and some green for stem and one or two leaves.


1) Make a yarnieloop: a loose slip knot or "magic ring" that can tighten so as to have small hole to center of ring.
Ch 1, 6 sc in yarn-ring,join with slip stich to 1st st to from a ring,then tighten te beginning loop (6sc in a ring) & 1st and second picture abow
2) ch 1, 2 sc in same st as joining,and in every sc around,join with sl st to first st (12 sc)
3) Ch 1,sc in same st as joining,sc in next st,*2sc in next st,sc in next sts* rep from* to* to last st,2 sc in last stich,join with sl st to first st.(18 sc)
4)Ch 1,sc in same st as joining,sc in next st, *2sc in next st,sc in next 2 sts*, rep from* to * to last st,2sc in last st,join with sl st to first st (24sc)
5)Ch 1,sc in same st as joining,sc in next 2 sts, *2sc in next st,sc in next 3 sts*, rep from * to * to last st,2sc in last st,join with sl st to first st (30sc). See 3rd picture above & centre is done :))
Then comes the Pink Color(or what color You would want that flower be)
& Petals :


6) Join new color ,* Ch 5(pic 1 of petals),sk 2 sts,sl st in next st *,repeat from * to * around,join in last ch 5 to beginning st of this round (pic 2 of petals abow) Now You should have 10 ch5 loops.
7) * Sl st into next ch5 loop,then work sc,hdc,3dc,sc and sl st all in the same loop * . Rep from * to * around,joining last sl st to beg st of this round. Fasten off (picture 3 of petals abow).
Weave in yarnie ends(pic 4 & 5 abow) and the flower´s "Head" is ready :))
Then Comes Some Grrreeen, stem & leaf :)
Stem:


Ch 24,1 dc in rd chain from hook (pic 1 of stem) and 1dc in every ch to end (pic 2 of stem),2 sl to last dc and 3 chain (pic 3 of stem... as to turn and makind another side of stem),working into the opposite side of the chain,make same dc in every stich to end of chain,so You come back to first chain stich (pic 4 of stem)
Fasten off leaving a long yarnietail. Fold the stem along the beginning chain and sew the edges closed with the yarnietail ( pic 5 of stem)
Leaf, make one or two:


Leaf:
1) Ch 9,sc in 2nd ch from hook,sc in next ch,dc in next 4 chs,sc in next 2 chs. Ch1,turn and make same stiches in opposite side of chain(2sc,4dc,2sc),so You come back to the first chain stich.
2) Slip stich around all stiches just to make nice "border" to leaf ,and fasten off, leaving a long yarnietail and sew the leaf(s) to the stem. (pic 1 & 2 of leaf and stem)
Sew the stem to flower´s back, so now You have made the simple flower :))
But if You want it tobe a plant in pot :)) ,now we are going to add some more:

Make another Centre ,leaving enough long yarnietail as to sew that to back as to hide the beg of stem...


Just before closing the center,add some "stuffings" as to make centre more...fat?(not right word but You know what I mean :) )

Sew buttons to both side(or just right sidemight be better but...) of flowers centre (just if You like)
Then...
Add some "filling"(,metal wire...don´t know this hobby-metal-yarnie´s right word) to stem as to put that flower to stand in pot :)))
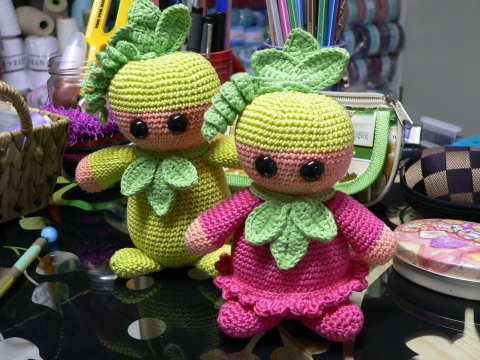
Dadaa:

Emil´s Flower in a Pot :))

...northern side... :)

...and how the flying bird would see this :)))
...if You want to make that green "ground" to pot, make 12 dc to yarnieloop like you did that centre,then 2 dc to each dc.s around, then 2 dc every second dc.s around,then 2 dc in every third around and continue as long you are gonna have enough big circle to fill the pot...then sew flowers stem to centre...
That was that :))
One wish: You can do this Emil´s flower to yourself or as a gift to give to your friend or to charity,but Do not make these by any meaning of earn some money without written promission of me. You can copy this flower pattern to Your blog but it would be nice to know about it so I could come to visit & see your Emil´s Flower,that would be soo great!! Thanks & Have Fun :))
Next time we might change this flower tobe "that jewerly thing with pin" :))
Happy Crochetings to You with Hugs :),hope I didn´t make so many wrongwritings,but if you notice something,please let me know :)
To Finnish people: Tarvittaessa voidaan kääntää tämän kukkasen ohje myös suomeksi :)), suurin osa taitaa pärjäillä kuitenkin ihan tämänkinkielisellä versiolla,vai kui :)
Pidä hauskaa virkkaillessa :)


Kommentit
Tämän blogin kommentit tarkistetaan ennen julkaisua.